Action Figure Art
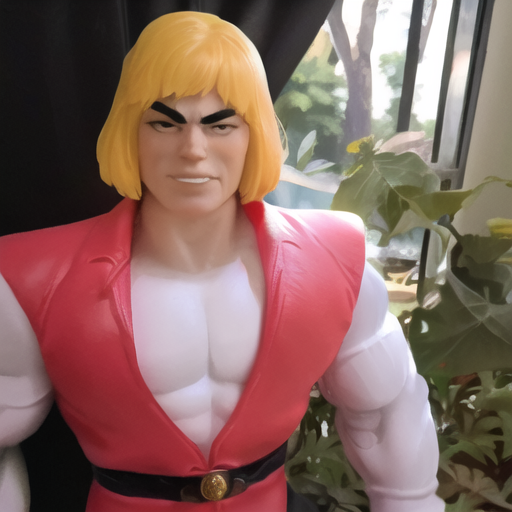
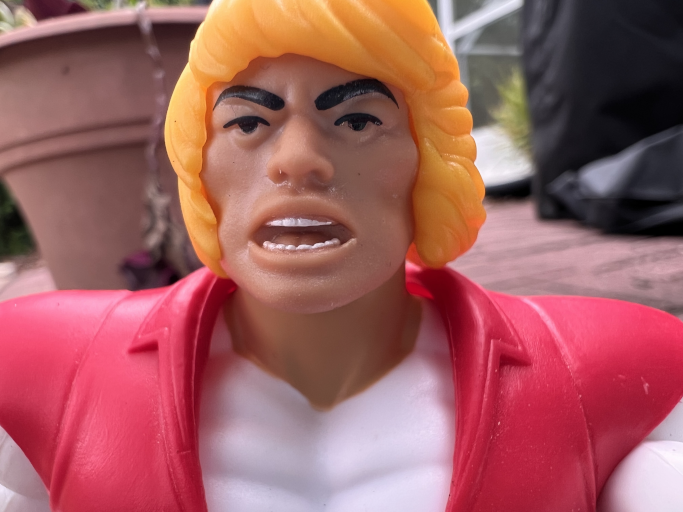
Growing up in the ‘80s, I loved vintage action figures: their bold colors, dynamic poses, worn paint and plastic seams. So when I trained a Stable Diffusion LoRA model using photos of my Masters of the Universe Prince Adam figure, I ran into a problem: the AI was too accurate. It perfectly replicated the figure’s plastic texture, paint flaws, and stiff pose, making the results look more like a toy than a legendary hero.
I wanted to go further to transform Prince Adam into different styles, free from his plastic origins. That’s where regularization images came in, helping to prevent overfitting and guide the AI’s creative direction. My goal? Keep his iconic costume (white shirt, pink vest) but reimagine him in nostalgic, artistic styles.
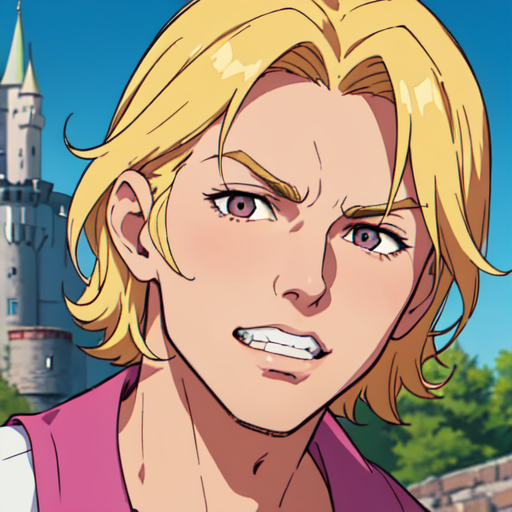
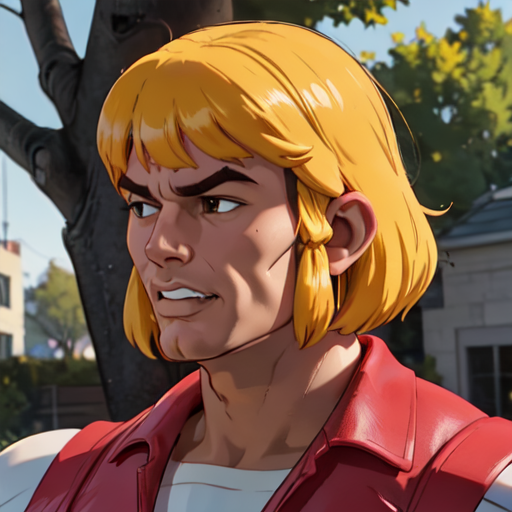
Experiment 1: Anime-Inspired Heroism

I first generated regularization images of anime-style characters wearing Prince Adam’s outfit. This gave the AI two guides:
- My action figure photos (for costume accuracy).
- Stylized anime references (for anatomy and texture).
The result? A Prince Adam with flowing hair, fabric-like clothing, and dynamic lighting. Bridging the gap between toy and anime hero.
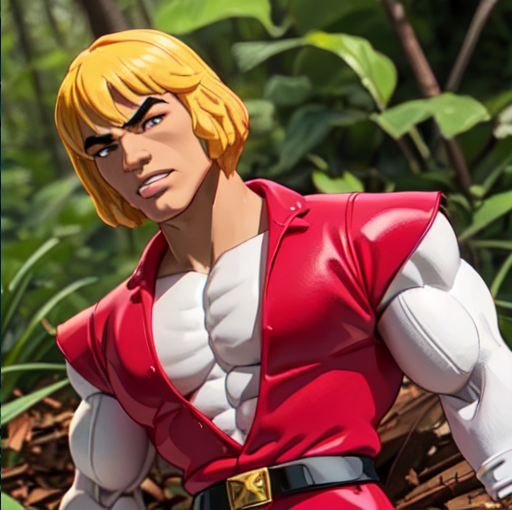
Experiment 2: Retro Cartoon Resurrection
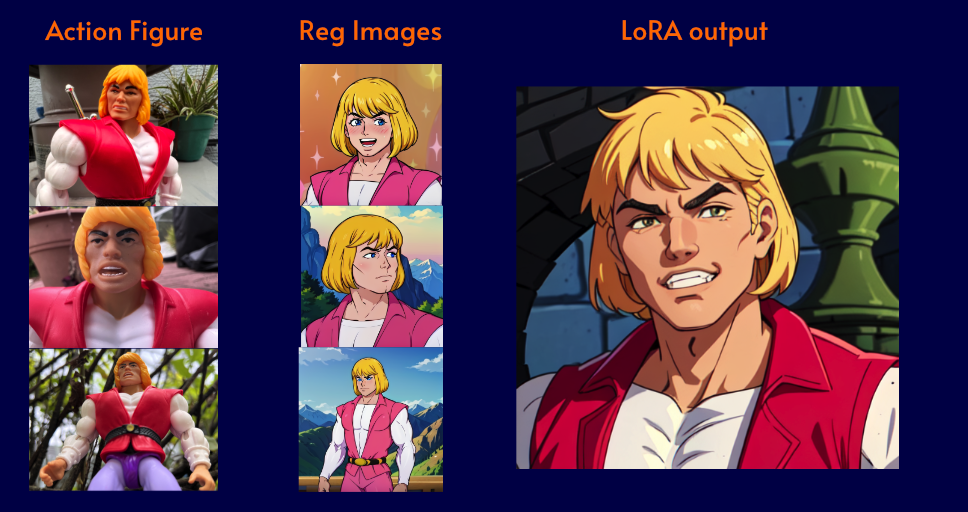
Next, I used screenshots from the original 1983 Masters of the Universe cartoon as regularization images. This transformed the plastic sheen into cel-shaded vibrancy and replaced his stiff pose with a battle-ready stance, straight out of the show.
What are Regularization Images?
Regularization images are used to prevent overfitting and language drifting during model training. They work by implementing prior-preservation loss, which ensures the model retains its understanding of the original class (e.g., “1boy” or “person”) while learning new concepts (e.g., a specific action figure). Without regularization, the model might overfit to the training data, losing its ability to generate diverse, class-consistent outputs or correctly interpret prompts. By including generic images of the original class, regularization keeps the model balanced and prevents it from “forgetting” its prior knowledge.
📄 Regularization tackles two key challenges with model training: overfitting and preserving class distinctions.

By creating regularization images, you’re defining a “class” of what you’re trying to invert. For example, if you’re trying to invert a skateboard, you might want to create a collection of skateboard images for regularization. This is to prevent your training from drifting into another class, let’s say “bike” or “roller skates.” It also helps guard against heading towards a “toy skateboard” if you are using real references and not interpretations.
Regularization ensures that the images you’re trying to invert don’t overfit. Overfitting occurs if the likeness to the images you generate becomes too similar to the training set. One challenge with textual inversions is the potential loss of editability during inversion, especially with prolonged training. The inclusion of regularization images and adjustments to learning rates helps mitigate this issue.
Regularization ensures your model stays on course, navigating the delicate balance between fidelity to the training set and adaptability to novel inputs.
| Aspect | Regularization | No Regularization |
|---|---|---|
| Class Definition | Explicit anchoring | Implicit learning |
| Failure Modes | Underfitting if overdone | Overfitting/drift |
| Data Efficiency | Better generalization | Requires more data |
Regularization helps us make sure our models can correctly classify new data points they were not trained on. The ability to work well with new data is called “generalization.” If we don’t use regularization, our models can become too complex and “overfit” to the training data, meaning they won’t work well with new data.
Using too much regularization can be a problem. It can lead to “underfitting,” which means our model doesn’t work well with the training data. This happens when we limit our model’s ability too much.
📄 Imagine a graph of points. We need a function that fits them well: a simple one might miss the mark, while an overly complex one could fit perfectly but fail with new data. The goal is to balance simplicity and complexity for optimal performance.
Scenario 1: Limited Training Data
Situation: You only have a few images of your cat and no other cat images.
Problem: The model lacks sufficient data to learn general “cat” features, making it unable to accurately recognize your cat.
Solution: Use regularization images of diverse cats to teach the model general cat characteristics, improving its ability to recognize your specific cat.
Scenario 2: Imbalanced Training Data
Situation: You have many images of other cats but only a few of your cat.
Problem: The model may focus too much on the other cats, failing to learn the unique features of your cat.
Solution: Add regularization images of generic cats to help the model focus on general cat features, ensuring it doesn’t get distracted by irrelevant details from the other cats.
Divergence
Divergence occurs when a model becomes unstable and fails to learn meaningful patterns, leading to erratic, low-quality outputs. This instability often arises from overly large or inconsistent datasets that lack clear, generalizable features. Instead of accurately capturing the subject’s likeness, the model produces unpredictable or incorrect results.
Preventing divergence starts with careful dataset curation selecting high-quality images with consistent and representative features helps the model focus on relevant patterns. Additionally, regularization techniques can reinforce learning stability, reducing the risk of both divergence and overfitting to noisy or inconsistent data.
- Chaotic outputs The model generates erratic images that lack structure, coherence, or resemblance to the intended subject. This often results from an excessive learning rate, poor dataset quality, or an imbalance between training and regularization images.
- Exploding gradients During backpropagation, weight updates grow exponentially, making the model’s parameters uncontrollably large. This leads to unpredictable updates and renders training ineffective. Techniques like gradient clipping can help mitigate this issue.
- Loss value instability (NaN/infinity values) The training loss fluctuates wildly, sometimes becoming
NaN(not a number) or reaching infinity. This typically indicates a numerical instability caused by extreme learning rates, batch size mismatches, or insufficient regularization.
📄 Backpropagation is considered the cornerstone of training deep neural networks, enabling them to learn complex patterns from large datasets.
Overfitting
Overfitting happens when a model memorizes the training data instead of learning generalizable patterns, leading to poor performance on new inputs. Signs of overfitting include:
- Perfectly replicates training samples The model reproduces training images with extreme accuracy, capturing even minor details and noise, rather than generalizing the features needed to create new, diverse outputs.
- Fails to generalize to new inputs The model struggles to produce high-quality results for inputs it hasn’t seen before. This happens when it over-relies on specific patterns from the training set instead of learning broader representations.
- Shows excellent training loss but poor validation loss The model achieves low loss during training but performs poorly on validation data, indicating that it has memorized the dataset rather than learning meaningful, generalizable features. Using techniques like dropout, data augmentation, and proper regularization can help reduce overfitting.
Key Differences
| Aspect | Divergence | Overfitting |
|---|---|---|
| Cause | Excessive learning rate | Insufficient regularization |
| Loss Behavior | Sudden spikes/NaN values | Steady decrease then rise |
| Output Quality | Random noise/artifacts | Overly detailed replicas |
| Recovery | Requires restart | Early stopping works |
Preventing Divergence
| Situation | Outcome |
|---|---|
| Excessive/inconsistent data | Model struggles to learn and produces unreliable predictions. |
| Lack of unique features | Poor generalization leading to inaccurate outputs. |
| Carefully curated datasets | Improved learning by ensuring the model sees only relevant, high-quality data. |
| Regularization techniques | Helps maintain focus on essential features and prevents instability. |
By balancing dataset size, consistency, and regularization, we can train more stable and accurate models while avoiding divergence.
Implement these Strategies
To prevent divergence and overfitting during training, carefully configure your training parameters and regularization techniques. Start with a conservative learning rate (e.g., 1e-5) to avoid sudden spikes or NaN values in the loss, which are signs of divergence. Use gradient clipping (max_grad_norm: 1.0) to stabilize training by preventing excessively large updates to the model weights. A cosine learning rate scheduler ensures a smooth and stable adjustment of the learning rate over time, reducing the risk of instability.
For regularization, incorporate techniques like dropout (dropout_prob: 0.1) to prevent the model from over-relying on specific features, improving generalization. Use a small batch size (train_batch_size: 2) to introduce noise into the training process, which can help avoid overfitting. Additionally, limit the number of training steps (max_train_steps: 1500) to prevent the model from memorizing the dataset. By combining these strategies, you can train a robust model that generalizes well and avoids divergence / overfitting.
# Training parameters to prevent divergence
{
  "max_grad_norm": 1.0,    # Gradient clipping
  "learning_rate": "1e-5", # Conservative starting LR
  "lr_scheduler": "cosine" # Stable scheduling
}
# Regularization techniques
{
"dropout_prob": 0.1,
"train_batch_size": 2,
"max_train_steps": 1500
}Data Considerations
| Situation | Actual Risk | Solution |
|---|---|---|
| High LR + small batch size | Divergence | Lower LR, increase batch size |
| Inconsistent features | Overfitting | Improve dataset consistency |
| Insufficient reg images | Class leakage | Add 100-300 class images |
| High variance in training data | Mode collapse | Curate focused dataset |
This table outlines key AI training challenges, their risks, and solutions. A high learning rate with a small batch size can cause divergence, leading to chaotic outputs: fix this by lowering the learning rate and increasing the batch size.
Inconsistent features (e.g., lighting, poses) lead to overfitting, which a curated dataset prevents. Too few regularization images cause class leakage, making it harder to distinguish subjects, adding 100-300 images helps.
High variance in training data can result in mode collapse, producing repetitive outputs. Keeping the dataset focused ensures consistency. Each row offers a direct solution for better model performance.
Monitoring Tips
Before we start training the model, let’s go over how we can monitor the process and preview the results as it trains. For Stable Diffusion model training, I enjoy using kohya-ss/sd-scripts. These scripts can setup monitoring through TensorBoard as well which we will dive in later.
Track loss curves
Loss curves provide real-time feedback on how well the model is learning. They help identify issues like overfitting, divergence, or stalled training. Use TensorBoard to create these graphs.
# Install TensorBoard
pip install tensorboard

# Start TensorBoard (point to your log directory)
tensorboard --logdir=./logs
What to Monitor:
- Training Loss: Should decrease steadily but not too quickly.
- Validation Loss: Should follow a similar trend to training loss. A growing gap between the two indicates overfitting.
- Gradient Norm: Should remain between 0.1 and 10.0. Values outside this range suggest instability.
Warning Signs:
- Sudden spikes in loss → Likely divergence.
- Loss plateauing too early → Learning rate may be too low.
- Validation loss increasing while training loss decreases → Overfitting.
Generate validation images every 100 steps
Why It Matters : Validation images provide a visual check of the model’s progress and help catch issues like mode collapse or artifacts early.
 {
  "validation_frequency": 100,
  "num_validation_images": 4,
  "validation_prompts": [
    "photo of 1boy",
    "portrait of a person",
    "full body shot",
    "close-up face"
  ]
}
What to Look For:
- Consistency: Outputs should align with the training data style.
- Artifacts: Check for distortions, noise, or unnatural features.
- Diversity: Ensure the model isn’t collapsing to a single output mode.
📄 Use a fixed set of validation prompts and seeds to compare outputs across training runs.
Use Gradient Clipping
Why It Matters: Gradient clipping prevents exploding gradients, which can cause training instability and divergence. 1.0-2.0 Norm.
Key Insights:
- Gradient Norm
<than 0.1: Training may stall due to tiny updates. - Gradient Norm > 10.0: Risk of divergence; reduce learning rate or clip gradients.
- Ideal Range: 0.1 to 2.0 for stable training.
📄 Monitor gradient norms in TensorBoard to fine-tune clipping thresholds.
Enable Mixed Precision Training
Why It Matters: Mixed precision training speeds up training and reduces VRAM usage without sacrificing model accuracy.
# example in pytorch
scaler = torch.cuda.amp.GradScaler()

with torch.cuda.amp.autocast():
    outputs = model(inputs)
    loss = criterion(outputs, targets)

scaler.scale(loss).backward()
scaler.step(optimizer)
scaler.update()
Benefits:
- 2-3x Faster Training: Leverages GPU tensor cores.
- 50% Less VRAM Usage: Allows larger batch sizes or models.
- Minimal Accuracy Impact: Maintains FP32 precision for critical operations.
📄 Use torch.cuda.amp for automatic mixed precision (AMP) support.
Start with Conservative Learning Rates
Start off with 1e-5 to 1e-6. Why It Matters: A conservative learning rate prevents divergence and ensures stable training, especially during early epochs.
Text Encoder: 1e-6 to 5e-6
UNet: 1e-5 to 5e-5| Option | Values | Effect |
|---|---|---|
learning_rate |
0.005 - 0.0001 | Main control for learning rate. Sets defaults for the other two. |
unet_lr |
0.0001 - 0.005 | Sets Unet’s learning rate. Most sensitive part; avoid setting too high. |
text_encoder_lr |
0.00001 - 0.00005 | Sets text encoder’s learning rate. Keep much lower than Unet’s. |
What does this mean?
- If you don’t want to fine-tune, just use
--learning_rateto set the other two automatically. - If you want more control, set
--unet_lrand--text_encoder_lrindividually. Setting--learning_ratebecomes redundant in this case. - A common approach is to set
--learning_ratethe same as--unet_lrfor simplicity.
Text Encoder Learning Rate
The text encoder interprets text prompts and links tags/tokens to data in the Unet during training.
- Default Value: 5e-5 (or uses
--learning_rateif not specified).
Effects:
- Lowering it helps separate objects better in generations.
- If unwanted objects appear, try lowering it.
- If prompts require heavy weighting to make things appear, it’s set too low.
A well-trained text encoder improves prompt control and feature granularity.
Unet Learning Rate
The Unet acts as the model’s “visual memory,” handling image structure, detail, and relationships between elements.
- Default Value: 1e-4 (avoid changing unless necessary).
- Issues & Fixes:
- Overfitting: Reduce learning rate, steps, or use dampeners.
- Visual Noise (blobs): Learning rate is too high: divide by at least 8.
- Weak Details: Increase learning rate or train for more steps.
The Unet works progressively, starting with broad shapes and adding finer details. Overcooking it can lead to misplaced or excessive features (e.g., eyes everywhere).
- Visualization: Think of it as zooming in from a blurry silhouette to pixel-level detail.
- Structure: IN blocks handle planning, OUT blocks manage fine details like texture.
Burning the Unet results in chaotic outputs.
Warning Signs:
- Loss Spikes: Learning rate is too high.
- Slow Convergence: Learning rate is too low.
- Oscillating Loss: Poor scheduling or unstable gradients.
| Practice | Key Benefit | Tool/Setting | Warning Signs |
|---|---|---|---|
| Track Loss Curves | Detect overfitting/divergence early | TensorBoard, Weights & Biases | Spikes, plateaus, growing gaps |
| Generate Validation Images | Visualize model progress | Fixed prompts/seeds | Artifacts, mode collapse |
| Gradient Clipping | Prevent exploding gradients | clipgrad_norm (1.0-2.0) | Norm > 10.0 or < 0.1 |
| Mixed Precision Training | Faster training, lower VRAM usage | PyTorch AMP (torch.cuda.amp) | NaN values (disable if unstable) |
| Conservative Learning Rates | Stable training, avoid divergence | Start at 1e-5 to 1e-6, use scheduler | Spikes, slow convergence |
Generating Regularization images
Regularization images are generated using the model you’re going to train with before training. These generated images are based on the class name (e.g., 1boy).
According to the Dreambooth technique, 200 regularization images per training image. For example, if you have 16 images: 200 * 16 = 3200 total regularization images. When training, the math involved for calculating total steps is: repeats * training images >= repeats * regularization images
The quality of regularization images impacts the model’s performance, as they are learned during training. Ideally, a few hundred high-quality regularized images should be prepared. Inadequate quantities may hinder generalization of class images, affecting the model’s ability to learn distinctive features.
Important considerations
Use the same base model for regularization images and training
Ensure that both the regularization images and training data originate from the same base model. This maintains consistency in feature representation and prevents the model from learning conflicting styles or patterns.Maintain consistent class representation
The dataset should have a balanced distribution of each class to avoid bias. If certain classes dominate the dataset, the model may overfit to them while underperforming on underrepresented categories.Match output resolution to training data
The resolution of the generated outputs should align with the resolution of the training images. Mismatched resolutions can lead to artifacts, loss of detail, or unexpected distortions.
Generate using Stable Diffusion web UI
We’re going to use Stable Diffusion web UI to generate all the regularization images. There are other web UIs available to inference with Stable Diffusion. Personally preference, I like this better because the application is laid out like a data science tool with many options at your fingertips.
We’re going to use the X/Y/Z plot script to use Prompt Search & Replace to dynamically build a prompt that will generate hundreds of regularization images.
Select the text 2 image tab. Enter a generic prompt
princeadam, portrait, looking_at_viewer, forestIn generation parameters and select the
X/Y/Z plotscript.Select the
Xparameter andPrompt SRfor Prompt Replace. We’re going to replaceportraitwith different camera angle tags:close-up,upper_body,from_below,from_above,dutch_angleSelect the
Yparameter andPrompt SRfor Prompt Replace. Replacelooking_at_viewer:looking_away,looking_to_the_side,looking_ahead,looking_downSelect the
Zparameter andPrompt SRfor Prompt Replace. Replaceforestwith a vareity of locatinos:castle,mountain,cave,farm,oceanSelect a fast sampler like
DPM2 KARRASCFG Scale set to
7and Steps to20
After the inference finishes, gather the images that were generated and we’ll start captioning. We may only need 150 - 200 and keep in mind we can add and remove as we try different training settings with different output.
Download images
If generating these images isn’t an option, there are many repositories on HuggingFace that host regularization images generated with common models:
- 3ee Games regularization images: Our own regularization repository that has a large variety including architecture, horses, man, woman, forest, etc. All generated with Stable Diffusion 1.5.
- Pre-Rendered Regularization Images: Includes 1500 regularization images.
- Stable Diffusion 1.5 Regularization Images: includes art styles, illustration, landscapes, and many other types and themes of images generated with Stable Diffusion 1.5.
- Aitrepreneur SDXL image set: a large image set generated with Stable Diffusion SDXL.
Captioning Regularization images
While captioning regularization images isn’t strictly required, it significantly improves your model’s ability to learn meaningful patterns. Just like training images, captions help Stable Diffusion understand the relationship between visual features and text prompts. Critical for maintaining style consistency.
Here’s the workflow I used:
- Structured Filenames: Stable Diffusion Web UI automatically embeds prompts in filenames
- Automated Extraction: I wrote a simple script to convert filenames into .txt captions, preserving key details like
1boyorpurple_vest. - Manual Verification: Spot-checked captions to ensure accuracy.
@echo off
setlocal EnableDelayedExpansion EnableExtensions

:: Batch Caption Extractor
:: Creates .txt files from filenames containing prompts
:: Usage: Drag folder onto script or run in images directory

echo Starting caption extraction...
echo.

set count=0
set error_count=0

for %%i in (*.png *.jpg *.webp) do (
    set "original=%%~ni"

    :: Replace commas with a safer delimiter for processing
    set "safe_name=!original:,=|!"

    :: Extract caption (everything after the first comma)
    for /f "tokens=1* delims=," %%a in ("!safe_name!") do (
        set "caption=%%b"
    )

    :: Restore commas if a caption was extracted
    if defined caption (
        set "caption=!caption:|=,!"
    ) else (
        echo Warning: No comma found in "%%i" - using full filename
        set "caption=!original!"
    )

    :: Write to .txt file
    (
        echo !caption!
    ) > "%%~ni.txt" 2>&1 && (
        echo Created: %%~ni.txt
        set /a count+=1
    ) || (
        echo Error creating: %%~ni.txt
        set /a error_count+=1
    )
)

echo.
echo Process complete: !count! files created, !error_count! errors.
pause
- Save this file as
filename2txt.batand place it into the regularization images directory - Run:
.\filename2txt.bat. The script extracts the prompt from the filename and outputs a text file with the prompt. The text file is named the same filename as the image and will be picked up by the text encoder during training.
Example filename: 18967-19144263-izaniak, aburbres, princeadam, 1boy, close-up, purple_vest.png
Training a LoRA
Now we’re going to setup all the training data to create a LoRA model. We’re going to go over how to setup your training data to use regularization images with Kohya’s Stable Diffusion trainers. If you want to use a GUI, use Kohya’s GUI. In this article, you can will able to use either since the settings config can be modified in json and reloaded in the GUI.
📄 Learning how to train a LoRA is a completely different subject all on its own. See Kohya SD script documentation.
📄 Recommended reading: https://rentry.org/59xed3, https://rentry.org/ezlora, https://rentry.org/lora_train
Directory setup
In your configuration json, use reg_data_dir to point to the directory with your regularization images:
{
  "reg_data_dir": "c:/prince_adam_loras/reg_dir",
}
Within that folder, the setup is similar to setting up your train data directory, create directories with the following a repetition count and name:
<repetition count>_<identifier> <class>Set the number of iterations so that training images are used as often as or more often than regularization images.
In one epoch, the total data is
training images × iterations. If there are more regularization images than this, the extras won’t be used.
Create folders in the training image folder with the format <repetition count>_<class> multiple times, and similarly create folders in the regularization image folder with the format <repetition count>_<class>.
If there is only one class with multiple targets, you only need one regularization image folder. For example, if there is character A and character B in 1girl, it would look like this:
- train_data_dir
- 10_princeadam
- reg_dir
- 1_1boy
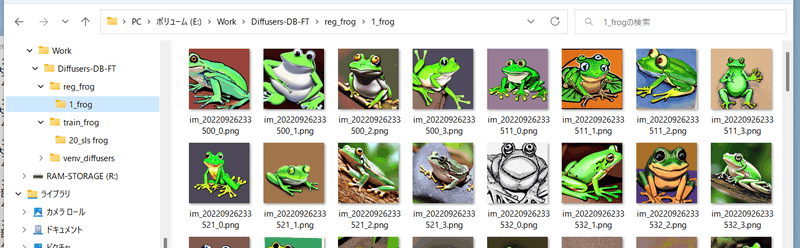
For example, with the prompt “frog” and not repeating the data (only once), it would look like this:
Training Settings
The training setup we’re going to use is: Number of images * repeats * epoch / batch size = total steps. Total Steps = (Number of Images × Repeats × Epochs) / Batch Size. Example: (45 × 10 × 20) / 2 = 4500 steps
| Number of Images | Repeats | Epochs | Batch Size | Total Steps |
|---|---|---|---|---|
| 45 | 10 | 20 | 2 | 4500 |
Now let’s focus on these training settings:
{
  "learning_rate": "1e-4",
  "text_encoder_lr": "1e-6",
  "unet_lr": "1e-5",
  "network_dim": 64,
  "network_alpha": 32
  "lr_scheduler": "cosine_with_restarts",
  "lr_scheduler_num_cycles": 12,
  "network_dim": 16,
  "network_alpha": 8,
  "clip_skip": 2,
  "max_token_length": "225",
  "noise_offset": "0.1",
  "reg_data_dir": "/prince_adam_loras/action/reg_dir",
}- Learning Rate (
learning_rate): Determines the step size during optimization, influencing how quickly the model adapts to training data. - Text Encoder Learning Rate (
text_encoder_lr): Sets the learning rate specifically for the Text Encoder, optimizing its contribution to the model. - UNet Learning Rate (
unet_lr): Specifies the learning rate for the UNet component, impacting its performance in the LoRA model. - Learning Rate Scheduler (
lr_scheduler): Utilizes a cosine annealing schedule with restarts for dynamic learning rate adjustment during training. - Number of Cycles: Sets the number of cycles for the cosine annealing schedule, influencing the frequency of learning rate restarts.
- Network Dimension (
network_dim): Defines the dimensionality of the latent space in the LoRA model, capturing more complex patterns but increasing computational demand. - Network Alpha (
network_alpha): Regulates the strength of regularization in ordinal regression loss, balancing fitting training data closely and preventing overfitting. - Clip Skip (
clip_skip): Acts as a safety net during training, skipping updates if the loss remains unchanged for two consecutive iterations, stabilizing the learning process. - Max Token Length (
max_token_length): Sets the maximum allowed length for input tokens, enabling training with longer captions. - Noise Offset (
noise_offset): Implements a diffusion process with offset noise, enhancing generation results for dark or bright images. - Regularization Data Directory (
reg_data_dir): Specifies the directory for regularization data, influencing the quality of regularization images during training.
Fine Tuning
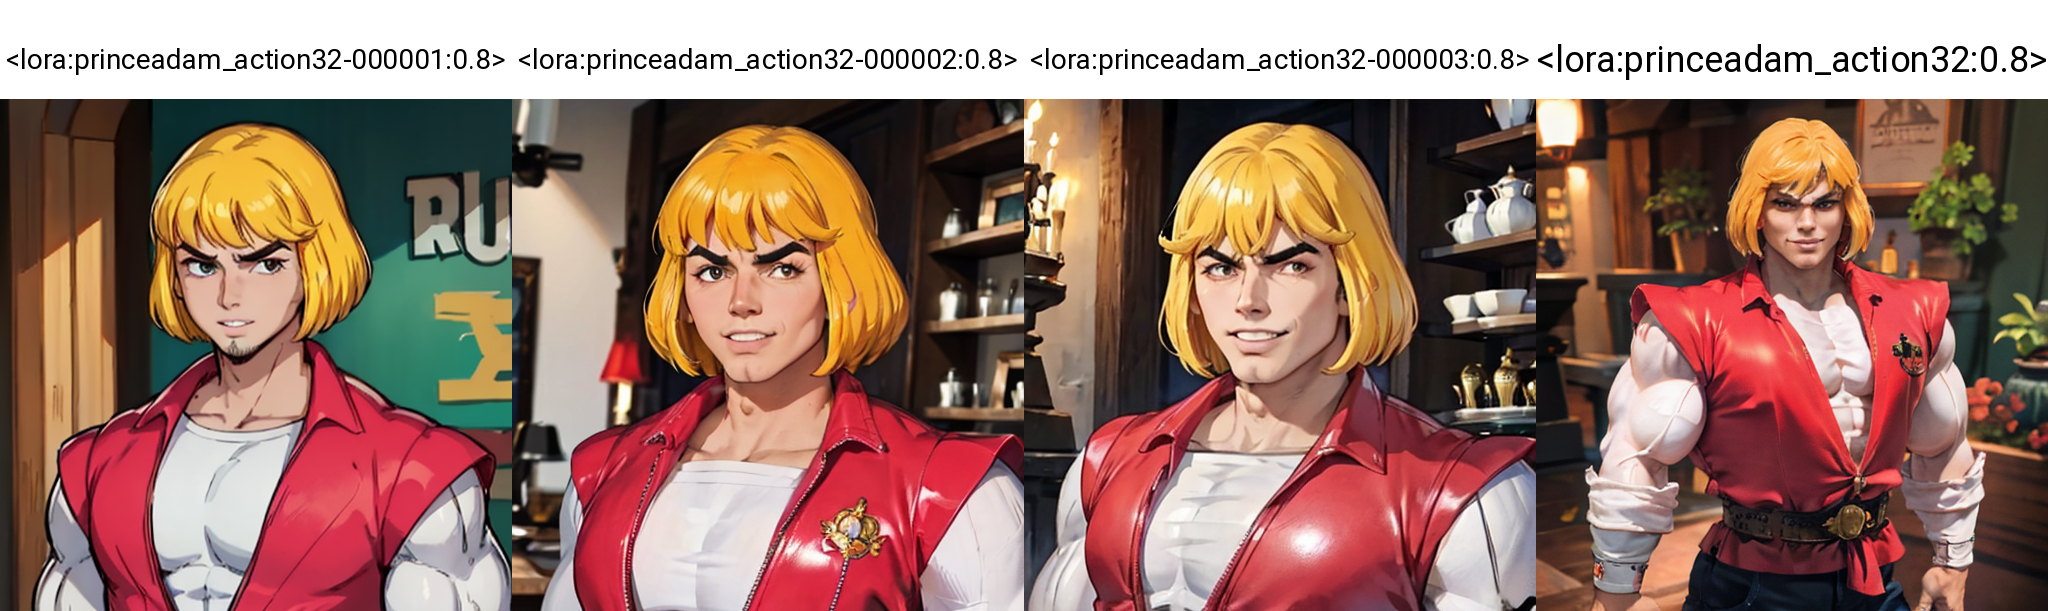
Once training has completed, it’s time to fine tune the model through visual inference with each step saved. We have 45 LoRAs but we only need to go through the higher steps that were output. Each represents a different LoRA saved at different epochs of the training session.

Workflow with Auto1111 WebUI
We’re going to use Stable Diffusion web UI to interface to fine tune the training output LoRA. There are other web UIs available to inference with Stable Diffusion. Personally preference, I like this better because the application is laid out like a data science tool with many options at your fingertips.
We’re going to use the X/Y/Z plot script to compare different epochs.
- Select the text 2 image tab. Enter a generic prompt princeadam, portrait,
- In generation parameters and select the X/Y/Z plot script.
- Select
Prompt SRfor Prompt Replace. We’re going to replace<princeadam0001:0.7>with different epoch:<princeadam0001:0.7>, <princeadam0003:0.7>, <princeadam0023:0.7> - Select a fast sampler like
DPM2 KARRAS - CFG Scale set to
7and Steps to20
After the inference finishes, a grid image will be generated. Use those results to pick which epoch best represents the subject. From there, we will fine tune more and view the strength of the LoRA. Test an entire range to get an accutre view using plot grids to figure out a prefered range for your LoRA’s strength. Recall setting network_dim and network_alpha? Those are the settings that directly control the output strength mentioned earlier.
Use another
- Select
Prompt SRfor Prompt Replace. We’re going to replace the weights<princeadam12:0.4>, <princeadam12:0.5>, <princeadam12:0.6>, <princeadam12:0.7>, <princeadam12:0.8>, <princeadam12:0.9>, <princeadam12:1.0> - Use Prompt SR to generate a variety of angles: Select
Prompt SRfor Prompt Replace. Replace upper_body with different camera angles: from_below, from_above, close_up. - If you found results you liked, keep testing different situations to see if your Lora can be creative and do things not in the training data.
- Use a Z axis and test different Checkpoint models with the LoRA model. You will still see likeness when using different models due to the weights being the same in the LoRA model.
Issues to look for
- Undercooked: Lacks output, adjust unet learning rate or extend training duration.
- Overcooked: Distorted images persist and earlier epochs offer no improvement, adjust learning rate or repeats.
- Overfit: Overly restrictive, consider dataset size, tagging quality, or slight overcooking as possible issues.
- Mismatched: Doesn’t match expectations, it might be undercooked or have a low-quality dataset.
If you’re experiencing these issues, it’s not uncommon to throw away the results and start again with a different set of parameters based on the previous setup. Training a LoRA that consistantly gives great results with each inference requires patience and fine tuning.
Troubleshooting
If you find your results aren’t what you expected, make note of the results and compare to what you were expecting. From there, figure out additional options to take when re-training:
- Lower input images, less regularization images needed. Remember Dreambooth calls for about
200regularization images per training image. - Repeats of regularization images, but may overfit more. Increasing the
repetition_countwill cycle through the images more but the results may have results that overfit the model. - Create more regularization images without increasing repeats will help with the overfitting.
| Issue | Situation | Recommendation |
|---|---|---|
| Varying quality | Results differ from expectations | Evaluate the quality and quantity of reg images. Adjust number and selection - check for better results. |
| Inadequate regularization for input data | Lower input images, less regularization needed | Reduce the number of input images or increasing the quantity of reg images. |
| Overfitting due to repetition | Repeats of reg images, risk of overfitting | Adjust repetition_count to balance cycling through images without overfitting. Monitor results. |
| Mitigate overfitting while increasing diversity | Create more reg images without repeats | Generate additional reg images without increasing repetitions. Enhance adaptability without overfitting. |
More Solutions
Need more help troubleshooting? Here are additional solutions to problems that might turn up in during or after training.
| Symptom | Likely Cause | Solution |
|---|---|---|
| Plastic texture persists | Insufficient human reg images | Add real photos to reg set |
| Loss plateaus early | Learning rate too low | Increase LR by 10x |
| Features blurry | Network dimension too small | Increase network_dim to 64+ |
| Color distortion | Noise offset conflict | Try noise_offset 0.05-0.1 |
| Overly stylized outputs | Reg image style mismatch | Regenerate reg images with base model |
| Training instability | Batch size too large | Reduce batch_size to 1-2 |
| Slow convergence | Network_alpha too high | Set alpha = dim/2 (e.g., 64/2 = 32) |
| Loss divergence | Text encoder LR too high | Reduce text_encoder_lr by 10x |
| Poor prompt adherence | Clip skip too high | Reduce clip_skip to 1-2 |
| Memory errors | Resolution too high | Reduce to 512-768px, enable gradient checkpointing |
Results
The delicate dance between overfitting and generalization has been choreographed with precision, allowing the model to navigate a nuanced artistic style in combining an action figure and regularization images.
Thoughtful application of regularization techniques and careful dataset curation are important while preparing to train a model. The results not only showcase the model’s ability to learn and adapt but also emphasize the importance of striking the right balance between simplicity and complexity for artistic performance.

The journey doesn’t end here; it extends into the realm of fine-tuning and continuous exploration. Each epoch, each adjustment, contributes to the evolution of the LoRA model, uncovering new dimensions of creativity and paving the way for future experiments in the realm of stable diffusion and generative art.